Disaster Recovery on the Security Management Appliance
If your Security Management appliance unexpectedly fails, use the following procedure to restore security management services and your backed-up data, which you regularly save using the information in Backing Up Security Management Appliance Data.
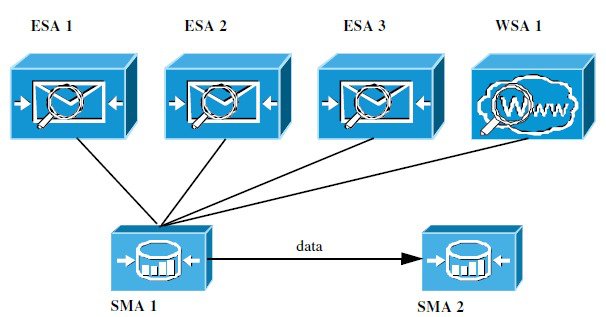
A typical appliance configuration might look as shown in the following figure:

In this environment, SMA 1 is the primary Security Management appliance that is receiving data from ESAs 1-3 and WSA 1. SMA 2 is the backup Security Management appliance receiving backup data from SMA1.
In case of failure, you must configure SMA 2 to be your primary Security Management appliance.
To configure SMA 2 as your new primary Security Management appliance and restore service:
Procedure
| Command or Action | Purpose | |
|---|---|---|
Step 1 | If you are using Centralized Policy, Virus, and Outbreak Quarantines:
| See instructions for disabling Centralized Policy, Virus, and Outbreak Quarantines in the Email Security appliance documentation. This will create local quarantines on each Email Security appliance, which you will migrate later to the new Security Management appliance. |
Step 2 | Load onto your backup Security Management appliance (SMA2) the configuration file that you saved from your primary Security Management appliance (SMA1). | |
Step 3 | Recreate the IP address from the failed SMA 1 to be the IP address on SMA 2 |
For more information about Adding IP Interfaces, see Configuring IP Interfaces. |
Step 4 | Submit and commit your changes. | |
Step 5 | Enable all applicable centralized services on the new Security Management appliance (SMA 2). | |
Step 6 | Add all appliances on to the new Security Management appliance (SMA 2).
| |
Step 7 | If you are using Centralized Policy, Virus, and Outbreak Quarantines, configure quarantine migration on the new Security Management appliance, then enable and configure the migration on each applicable Email Security appliance. | |
Step 8 | If necessary, restore additional data. |
What to do next
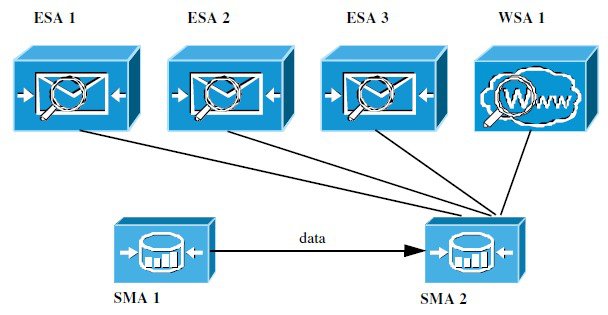
After this process is complete, SMA 2 becomes the primary Security Management appliance. All data from ESAs 1-3 and WSA 1 now goes to SMA 2, as shown in the following figure:
